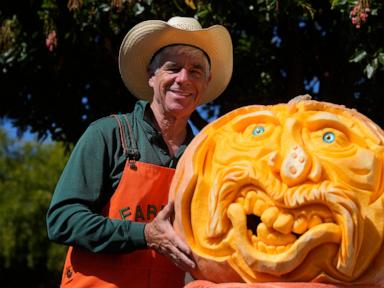
Most people grab a cheap serrated plastic saw from a grocery store aisle every October, hack two triangles into an orange gourd, and call it a day. Then they see a photo of a hyper-realistic, three-dimensional pumpkin sculpture with furrowed brows, expressive eyes, and wrinkled skin, and they assume it's fake. Or CGI. Or sculpted out of clay and painted orange.
It's real. And the artist most famous for turning an agricultural crop into fine art is Ray Villafane—a former Michigan art teacher who earned the nickname the "Picasso of Pumpkin Carvers" by treating pumpkins like blocks of marble rather than hollow lanterns.
If you've ever wondered how artists pull off 3D pumpkin sculpting without slicing straight through the pumpkin wall, you're looking at a completely different craft than traditional jack-o'-lantern making. You don't carve through the pumpkin. You sculpt into its flesh, using the thickness of the rind to create light, shadow, and anatomical depth.
Why Traditional Jack-o'-Lantern Techniques Fail at Realism
Traditional pumpkin carving relies on silhouettes. You scoop out the guts, thin the front wall so a candle shines through, and cut all the way through the skin. That binary approach—light versus dark, empty space versus solid wall—makes realistic human or monster faces almost impossible.
Three-dimensional pumpkin sculpting flips that process upside down.
When Villafane transitioned from teaching art in Bellaire, Michigan to sculpting pumpkins full-time—eventually winning Food Network's Outrageous Pumpkins challenge and carving for the White House—he wasn't using kitchen knives or stencil kits. He was applying classical figurative sculpture principles to Cucurbita maxima.
Here is why standard carving ruins 3D realism before you even start:
- Hollowing the pumpkin weakens the structure. Once you scrape the interior walls thin, you have zero depth left to carve recessed eye sockets, nostrils, or deep laugh lines without punching a hole straight into the cavity.
- Serrated saws tear plant fibers. Pumpkin flesh is fibrous and wet. Sawing back and forth shreds the surface, leaving fuzzy, ragged edges that rot within 24 hours.
- Symmetry kills expression. Beginners try to make both sides of a face match. Real faces—and great sculptures—rely on asymmetry, tilted brows, and uneven tension in the muscles around the mouth.
If you want to understand how the "Picasso of Pumpkin Carvers" builds a face that looks like it's about to speak, you have to stop thinking about Halloween crafts and start thinking about relief sculpture.
Choosing the Right Pumpkin for 3D Sculpting
Walk past the perfectly round, smooth, bright-orange pumpkins sitting at the front of the patch. Those are bred for uniform color and thin walls, which makes them terrible for sculpting.
You want the weird ones.
Professional pumpkin sculptors hunt for heavy, dense pumpkins with thick walls and unusual natural contours. When you pick up a pumpkin, it should feel surprisingly heavy for its size—like a bowling ball rather than a basketball. That weight tells you the flesh is thick and packed with moisture, giving you two to three inches of solid material to work with before hitting the seed cavity.
Look at the exterior bumps, ridges, and stem placement. Instead of fighting a crooked stem or a lopsided bulge, experienced sculptors use those flaws as anatomical landmarks. A deep vertical crease becomes the bridge of a nose. A bulbous protrusion on the lower third turns into a jutting chin or a gnarled cheek. A thick, curved stem off to one side becomes a top hat, a horn, or a tuft of hair.
The Tools That Actually Work on Pumpkin Flesh
Forget the $5 orange plastic kits sold next to the candy corn. Those bend, snap, and dull within ten minutes.
Serious 3D pumpkin carvers raid pottery studios and woodcarving workshops instead. Because pumpkin flesh behaves a lot like firm, wet clay, clay-modeling tools give you total control over curves, planes, and fine textures.
- Clay ribbon tools (loop tools). These are the single most important tools in 3D pumpkin carving. A metal wire loop attached to a wooden handle lets you shave away thin, controlled ribbons of pumpkin flesh without gouging. You can carve smooth concave curves for eye sockets and cheeks effortlessly.
- Exacto knives and scalpel blades. Used strictly for crisp, shallow incisions—defining eyelids, separating lips, or etching fine wrinkles around the eyes.
- Woodworking gouges. U-shaped and V-shaped gouges remove bulk material fast when you're blocking out the basic planes of a face.
- Soft-bristle paintbrushes and melon ballers. A melon baller scoops out clean spheres for eyeballs or deep nostrils, while a stiff brush sweeps away shredded pulp without bruising the surrounding flesh.
Notice what's missing? Power tools. While some artists use rotary tools for surface engraving on dried gourds, high-speed spinning bits turn fresh pumpkin flesh into orange mush and spray juice everywhere. Hand tools give you tactile feedback so you feel when the rind is getting too thin.
How 3D Pumpkin Sculpting Works Step by Step
You don't start by carving eyes or teeth. Beginners always rush to the details, and their sculptures end up looking flat—like a face drawn onto a basketball rather than a head emerging from a sphere.
Blocking Out the Primary Planes
First, shave off the outer orange skin across the entire area where the face will sit. That waxy outer peel resists fine shaping and creates harsh color contrast that distracts your eye from the actual 3D form. Once you expose the pale yellow-orange flesh underneath, you can read shadows accurately.
Next, establish the deepest points of the face. On a human skull, the deepest recesses are the eye sockets and the area just beneath the nose and cheekbones. Carve those areas back first. By pushing the eye sockets deep into the pumpkin wall, the brow ridge and cheekbones naturally project forward without you having to add material.
Building Volume Through Subtraction
Sculpting a pumpkin is purely subtractive. You can't slap extra clay onto a nose that you accidentally shaved too flat.
Always leave the tip of the nose, the brow, the cheekbones, and the chin proud (sticking out the furthest). Work your way backward from those high points. Shape the bridge of the nose as a series of flat planes first—top plane, two side planes, bottom plane—before rounding any edges. Planes catch light cleanly and immediately give the sculpture structure.
Carving Expressive Eyes and Mouths
Never carve flat circles for eyes. An eyeball is a sphere sitting inside a socket, wrapped by upper and lower eyelids.
Carve a rounded dome for the eyeball first, then carefully cut the crease of the upper eyelid so it overlaps the top third of that dome. That tiny overhang casts a real shadow onto the eye, instantly making the sculpture look alive. Carve a tiny, sharp notch in the corner of the eye to catch a glint of light, which mimics a wet tear duct.
For the mouth, avoid drawing a cartoon grin. Pull the corners of the mouth deep into the cheeks so the lips wrap around the curved barrel of the teeth and jaw. If you want exposed teeth, carve the gums first and separate individual teeth with subtle vertical grooves rather than deep black trenches.
Adding Skin Texture Last
Smooth pumpkin flesh looks like plastic under harsh lighting. Once the major anatomy is locked in, use the edge of a dull blade, a wire brush, or a crumpled ball of aluminum foil pressed gently against the flesh to break up the surface.
Add crow's feet radiating outward from the eyes. Etch cross-hatched lines across the forehead and upper lip. Those micro-textures trap moisture and shadow, tricking the human brain into reading wet plant fiber as weathered skin.
Why Carved Pumpkins Rot Fast and How to Slow It Down
The biggest heartbreak in 3D pumpkin art happens 48 hours after you finish. Because you've stripped away the protective outer skin, exposed pumpkin cells lose moisture rapidly, shrivel inward, and invite mold spores from the air.
Most viral internet hacks for preserving pumpkins don't work—or actively ruin your sculpture.
Smearing petroleum jelly (Vaseline) all over a carved pumpkin traps moisture inside, which accelerates bacterial rot and turns the flesh into slimy mush within days. Spraying bleach solutions kills surface mold temporarily, but bleach breaks down cell walls and bleaches the warm orange tones into a sickly, pale gray.
If you want a sculpted pumpkin to last a week instead of two days, treat it like fresh produce:
- Keep it cold. Temperature drives decay. Professional sculptors store their pieces in commercial walk-in coolers between exhibitions. At home, keep your pumpkin in a cool garage, basement, or shaded porch away from direct sunlight.
- Rehydrate with water, not grease. Mist the exposed flesh lightly with plain water from a spray bottle every few hours, or wrap the sculpture in a damp towel overnight and place it inside a large plastic bag in the fridge.
- Skip the real candle. Open flames bake the inside of the pumpkin from the inside out, cooking the flesh and collapsing your sculpture in a single night. Use cool-running LED puck lights or external spotlights aimed from above and slightly to the side to accentuate the 3D shadows you carved.
- Leave the back intact if you aren't lighting it from inside. Many professional 3D pumpkin sculptures aren't hollowed out at all. Leaving the pumpkin completely solid preserves its internal moisture reservoir and structural integrity, allowing detailed carvings to hold their shape for up to two weeks in cool weather.
Start With One Clay Loop Tool This October
You don't need an art degree or a giant 500-pound Atlantic Giant pumpkin to try 3D sculpting. Buy one cheap stainless-steel clay ribbon tool from a craft store, pick up the heaviest, weirdest-looking pumpkin at your local farm stand, and leave the seed cavity untouched. Shave off the skin, push the eye sockets deep, and let the shadows do the heavy lifting.